Booting process in BB
- Booting Process in Beaglebone black
- AM335x는 HW의 complex piece지만 제한된 internal RAM (128kB)를 가지고 있다.
- 제한된 RAM 용량 때문에, 다수의 부트로더 단계가 요구된다.
- 부트로더 단계는 체계적으로 디바이스의 모든 기능을 unlock한다. 커널에게 디바이스의 모든 복합성을 사용하도록한다.
- AM335x는 4 단계 부트로더 스테이지가 있다.
1) ROM
2) SPL (Secondary Program Loader)
3) u-boot
4) Linux Kernel
Boot StageTerminology #1Terminology #2Actual Program Name
| 1 | Primary Program Loader | - | ROM code |
| 2 | Secondary Program Loader(SPL) | 1st stage bootloader | u-boot SPL (여기서는 MLO) |
| 3 | - | 2nd stage bootloader | u-boot |
| 4 | - | - | kernel |
I. ROM
1st stage bootloader: ROM Code
- 부트로더 1st stage는 디바이스의 ROM에 flash된다.
- ROM code는 디바이스가 start-up 혹은 Power-on Reset(POR) 이후에 자동적으로 실행되는 코드의 첫 번째 블럭에 있다.
- 하드코딩 되어 있어서 user가 바꿀 수 없다.
- ROM code는 두 가지 주요 기능이 있다.
- 디바이스의 Configuration, Primary peripherals의 초기화
- stack setup
- configure watchdog timer 1 (set to three mins)
- PLL, System clock configuraiton
- Next bootloader에 대한 디바이스 준비
- next bootloader용 boot source (SPL) 체크
- 실행될 next bootloader code를 memory로 옮김
- 디바이스의 Configuration, Primary peripherals의 초기화
- ROM code의 주요 목적은 second stage bootloader(SPL; Secondary Program Loader)에 대한 디바이스 셋업이다.
- 기본적으로 Sitara AM3359 내부의 ROM Code는 onboard eMMC인 MMC1 인터페이스로 부터 처음 부트된다.
뒤이어 MMC0 (external uSD), UART0 and USB0에서 부트된다. - boot switch(S2)가 power-up하는 동안 눌려지면, ROM은 SPI0 인터페이스에서 처음 부트될 것이고 뒤이어 MMC0(external uSD), USB0, UART0에서 부트된다.
- 기본적으로 Sitara AM3359 내부의 ROM Code는 onboard eMMC인 MMC1 인터페이스로 부터 처음 부트된다.
II. SPL
2nd stage bootloader: SPL
- full 기능의 u-boot는 400kB이상 될 수 없다. (internal RAM; AM335x는 128kB)
- 그런 이유로, u-boot SPL(Second Program Loader)라고 불리는 u-boot cut down 버전이 처음에 로드된다.
- SPL이 CPU를 초기화하면, 풀 버전의 u-boot(u-boot.img)를 chain load한다.
- SPL의 이름은 MLO가 될 것이다.
- MMC의 active first partition에 위치 될 것이고 FAT12/16/32로 format 되어야한다.
III. u-boot
3rd stage bootloader: u-boot
- u-boot 시리얼 터미널을 통한 커널 부트 환경을 강력한 커맨드기반 제어를 할 수 있다.
- user는 boot argument나 kernel boot command와 같은 다수의 parameter에 대해 전체적인 컨트롤 할 수 있다.
- 추가적으로 u-boot 환경 변수는 configure할 수 있다.
- 이러한 환경변수는 기억 매체에 uEnv.txt에 저장된다.
- u-boot의 built-in 환경은 부팅 때, 커널에 전해 주기 위해 기본적으로 am335x-boneblack.dts를 로드한다.
- uEnv.txt에서 분명하게 다른 DTS를 지정할 수 있고, 커맨드라인 argument를 커널에 전달할 수 있다.
- u-boot는 또한 DHCP를 통한 network information 얻기 및 로딩해 환경 변수에 전달할 수 있다.
- 마지막으로 u-boot는 커널과 DTS를 memory로 로드하고 some 커맨드라인 arguments를 갖고 커널을 부팅한다.
- 커널 초기화와 rootfs를 마운트한다.
- 기본적으로 rootfs는 microSD 카드의 second partition(mmcblk0p2)에 포함되며, ext3 파일시스템으로 포맷된다.
SD카드 피티션 부팅 파티션 셋팅
1. SD 카드 꼽기
2. lsblk 로 어떻게 마운트 되있는지 찾아보기
• 다음과 같은 그림이 나옴

3. 언마운트 umount
$ umount /dev/sda1
$ umount /dev/sda2
4. fdisk 명령 실행, 이전 파티션 제거
• fdisk 명령 참고
$ sudo fdisk /dev/sda		# sda1 같은게 아닌 '디바이스 기준'
Command (m for help): d		# d는 파티션 삭제 명령
Selected partition 1
...중략
Command (m for help): d
Selected partition 2
Partition 2 has been deleted.

Command (m for help): p		# p로 디바이스 정보 조회
Disk /dev/sda: 29.8 GiB, 32026656768 bytes, 62552064 sectors
Units: sectors of 1 * 512 = 512 bytes
Sector size (local/physical): 512 bytes / 512 bytes
I/O size (minimum/optimal): 512 bytes / 512 bytes
Disklabel type: dos
Disk identifier: 0x7b59cb23

Command (m for help):
5. fisrt partition primary타입의 32MB의 파티션 생성
Command (m for help): n			# n 으로 새로운 파티션 생성
Partition type:
    p	primary (0 primary, 0 extended, 4 free)
    e	extended
Select (default p): p		# p나 엔터를 쳐도 디폴트로 primary된다.
Partition number (1-4, default 1): 1 	# 파티션 넘버 1 지정
First sector (2048-62552063, default 2048):	# First Sector: 2048
Using default value 2048
Last sector, +sectors or +size{K,M,G} (2048-62552063, default 62552063): +32M # 2048 + 32MB

Created a new partition 1 of type 'Linux' and of size 32 MiB.
Partition #1 contains a vfat signature.

Do you want to remove the signature? [Y]es/[N]o: Y

The signature will be removed by a write command.
6. second partition에 rootfs 빌드할 것임
Command (m for help): n
Partition type:
    p	primary (1 primary, 0 extended, 3 free)
    e	extended
Select (default p): p
Partition number (1-4, default 2): 2
First sector (67584-62552063, default 67584):
Using default value 67584
Last sector, +sectors or +size{K,M,G} (67584-62552063, default 62552063):

Create a new partition 2 of type 'Linux' and of size 29.8 GiB.
Partition #2 contains a ext4 signature.

Do you want to remove the signature? [Y]es/[N]o: Y

The signature will be removed by a write command.
7. first partition은 boot flag 설정
• fdisk에서 a 옵션은 부팅 파티션 설정이다.
Command (m for help): a
Partition number (1,2, default 2): 1

The bootable flag on partition 1 is enabled now.
8. first parititon을 WIN95 FAT32 (LBA)로 셋
Command (m for help): t	# t 명령은 파티션의 시스템 ID 변경(파일 시스템 종류 변경)
Partition number (1,2, default 2): 1
Hex code (type L to list all codes): L
...중략...
 c  W95 FAT32 (LBA)
...중략...
Hex code (type L to list all codes): c

Changed type of partition 'Linux' to 'W95 FAT32 (LBA)'.

Command (m for help): p
Disk /dev/sda: 29.8 GiB, 32026656768 bytes, 62552064 sectors
Units: sectors of 1 * 512 = 512 bytes
Sector size (logical/physical): 512 bytes / 512 bytes
I/O size (minimum/optimal): 512 bytes / 512 bytes
Disklabel type: dos
Disk identifier: 0x7b59cb23

Device	  Boot	Start	End		Sectors		Size	Id	Type
/dev/sda1 *	2048	67583		65536		32M	c	w95 FAT32 (LBA)
/dev/sda2	67584	62552063	62484480	29.8G	83	Linux

Filesystem/RAID signature on partition 1 will be wiped.
Filesystem/RAID signature on partition 2 will be wiped.

Command (m for help): w		# 꼭 w 로 저장후 fdisk 명령을 종료해야함
The partition table has been altered!
Calling ioctl() to re-read partition table.
Syncing disks.
9. Format first partition as FAT using the following cmd
• label을 BOOT 으로 set
$ sudo mkfs.vfat -n "BOOT" /dev/sda1
10. Format second partition as ext4 using the following cmd
• label을 ROOT 으로 셋
$ sudo mkfs.ext4 -L "ROOT" /dev/sda2
mke2fs 1.44.1 (24-Mar-2018)
Creating filesystem with 7810560 4k blocks and 1954064 inodes
Filesystem UUID: eb928e08-5745-4b1a-9f16-31c17af70077
Superblock backups stored on blocks:
	32768, 98304, 163840, 229376, 294912, 819200, 884736, 1605632, 2654208,
    4096000

Allocating group tables: done
Writing inode tables: done
Creating journal (32768 blocks): done
Writing superblocks and filesystem accounting information: # 1~2 분 소요됨 -> done
11. Copy bootloader to SDcard
• SD카드는 자동으로 /media/${USER}에 마운트된다.
안되면, 수동으로하자
$ sudo mount /dev/sda1 /media/${USER}/BOOT
$ sudo mount /dev/sda2 /media/${USER}/ROOT
• 마운트 정보 조회
$ mount
...중략...
/dev/sda2 on /media/$USER/ROOT type ext4 (rw,nosuid,nodev,relatime,uhelper=udisks2)
/dev/sda1 on /media/$USER/BOOT type vfat (rw,nosuid,nodev,relatime,uid=1000,gid=1000,fmask=0022,dmask=0022,codepage=437,iocharset=iso8859-1,shortname=mixed,showexec,utf8,flush,errors=remount-ro,uhelper=udisks2)
12. Copy MLO, u-boot bootloader를 부트 파티션으로
$ sudo cp MLO /media/${USER}/BOOT
$ sudo cp u-boot.img /media/${USER}/BOOT
13. Copy Kernel image도 부트 파티션으로
$ sudo cp zImage /media/${USER}/BOOT
$ sudo cp am335x-boneblack.dtb/${USER}/BOOT
Check files

14. [IMAGE].tar.bz2를 ext4 파티션에 압축 해제
$ sudo tar -xf core-image-minimal-beaglebone-yocto.tar.bz2 -C /media/${USER}/ROOTCheck files

$ sync 명령!!

sync 명령
시스템 작업을 위하여 모니터를 보고 있는 이 순간에도 뒤에서는 IO 작업이 이루어진다.
IO작업이 이루어지는 도중 전원이 나가거나 장애로 인해 시스템이 다운되거나 umount, 카드 강제 eject 되면 메모리 데이터 유실
그래서 데이터 명령 입력 후 sync 명령을 내려 동기화
SD card umount
$ sudo umount /media/$USER/BOOT
$ sudo umount /media/$USER/ROOT
Serial Communication
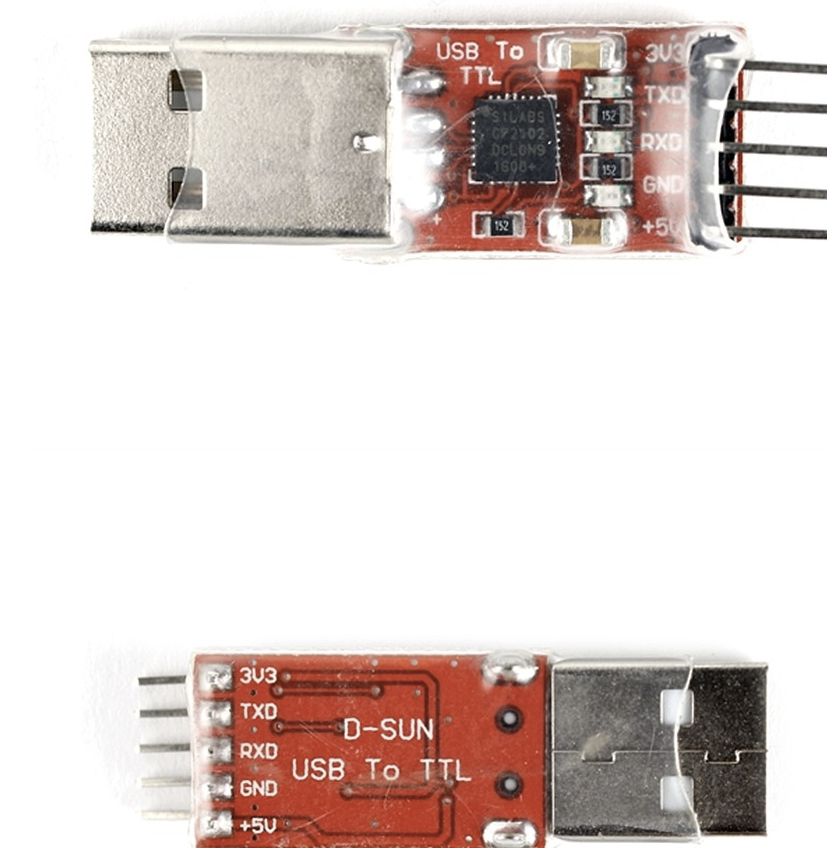
- Host와 Target(beaglebone black)을 시리얼 통신
- USB TTL-2303(PL2303) for serial communication
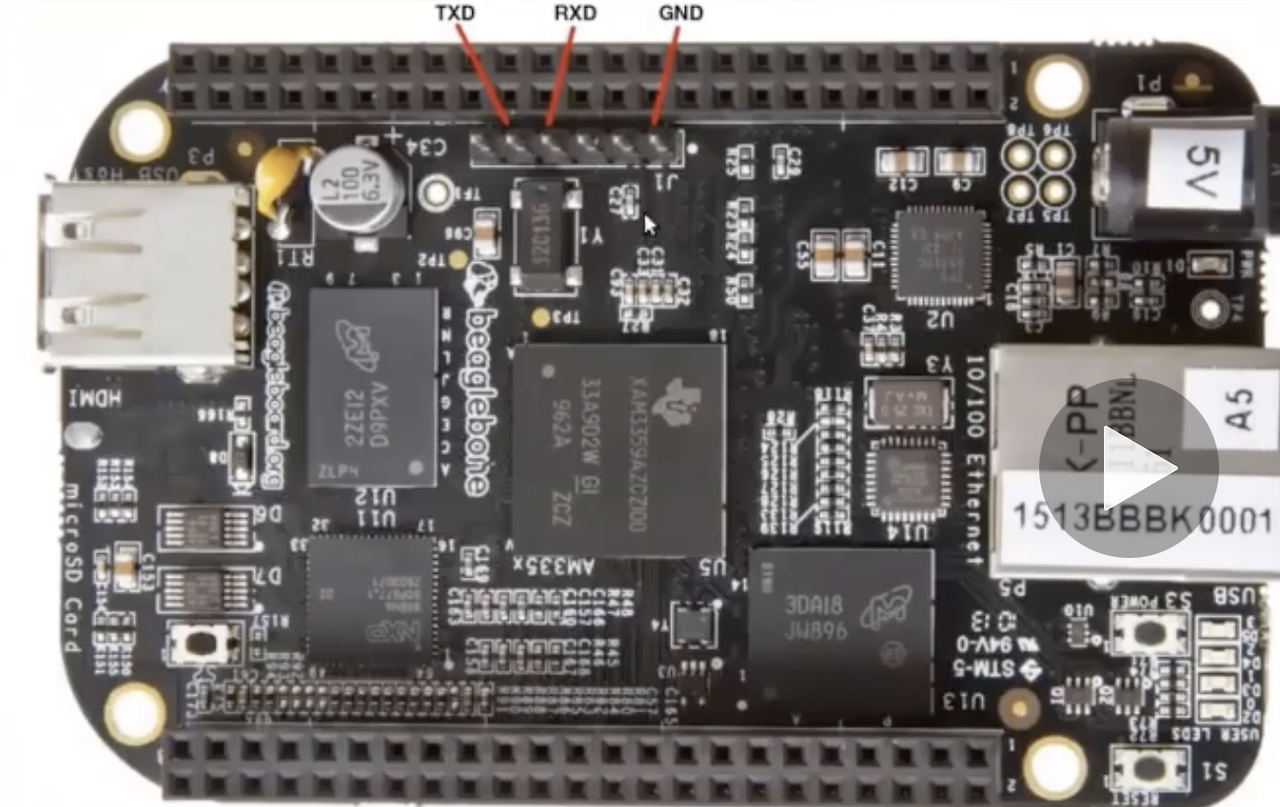
- Serial 연결
USB-TTL <-> J1 Connector of Beaglebone Black
J1 PinUSB TTL Function
| 1 | GND ground |
| 4 | RXL |
| 5 | TXL |
- $ dmesg
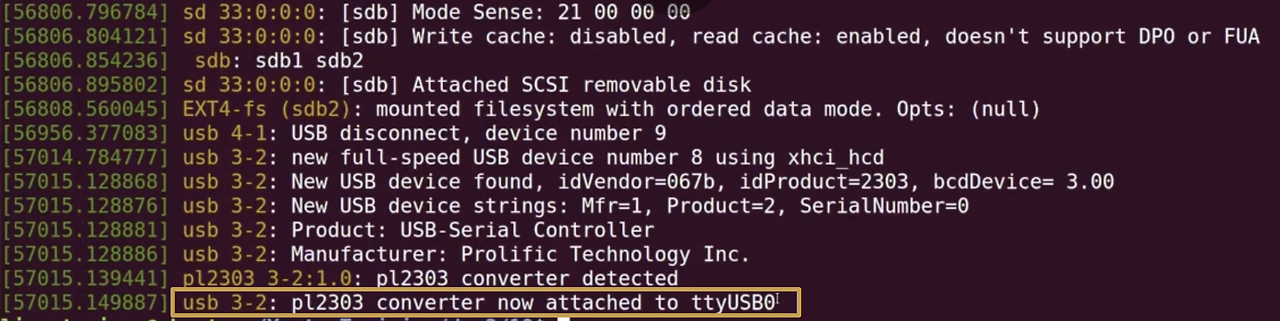
Host에서 Target Device와 USB serial 연결 확인
- minicom 연결
$ sudo minicom -s- Host에서 minicom 명령으로 Target과 Serial 통신
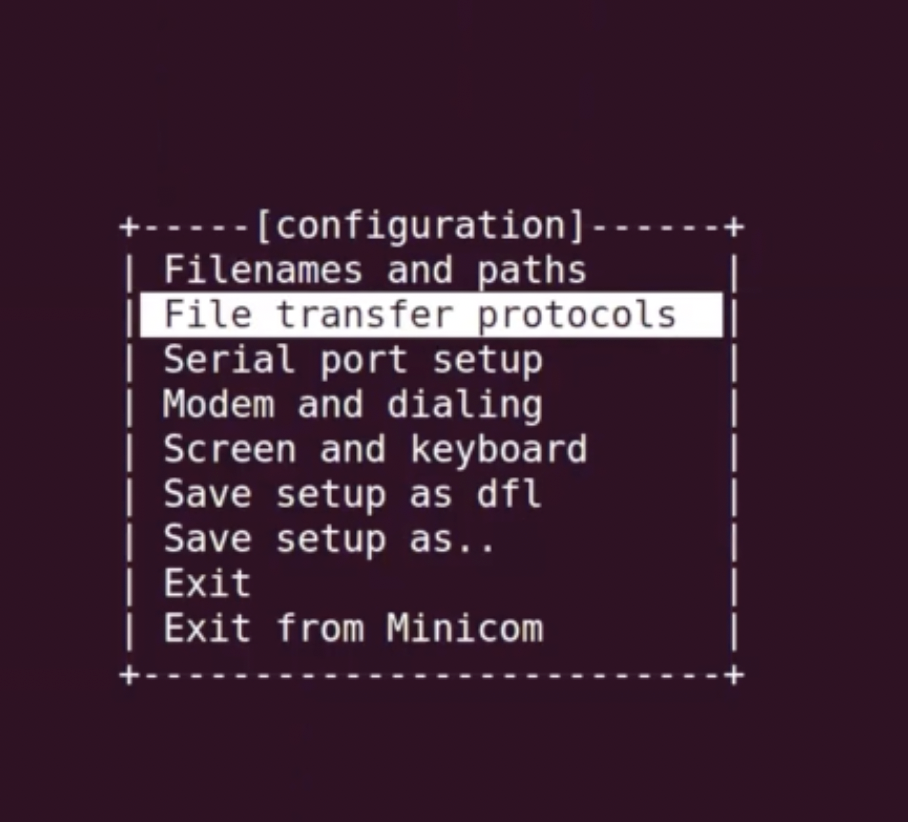
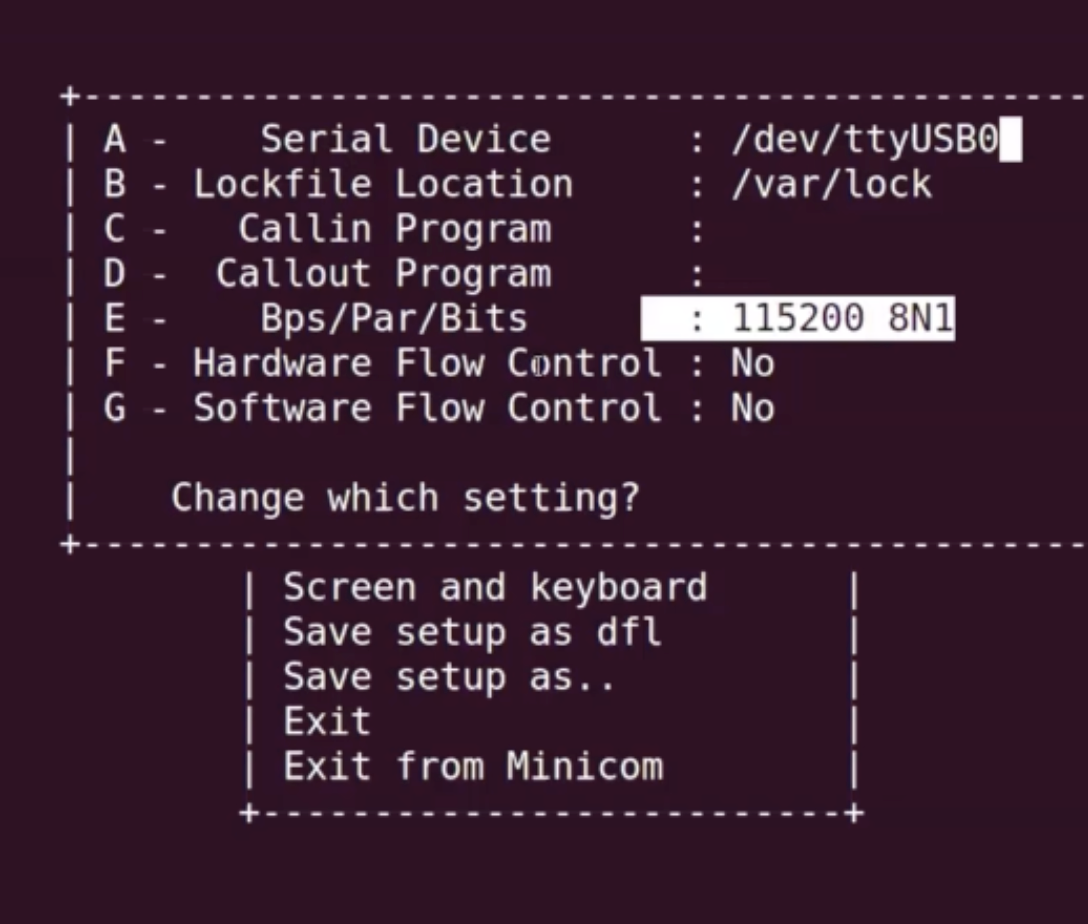
위와 같이 설정후 Save setup as...
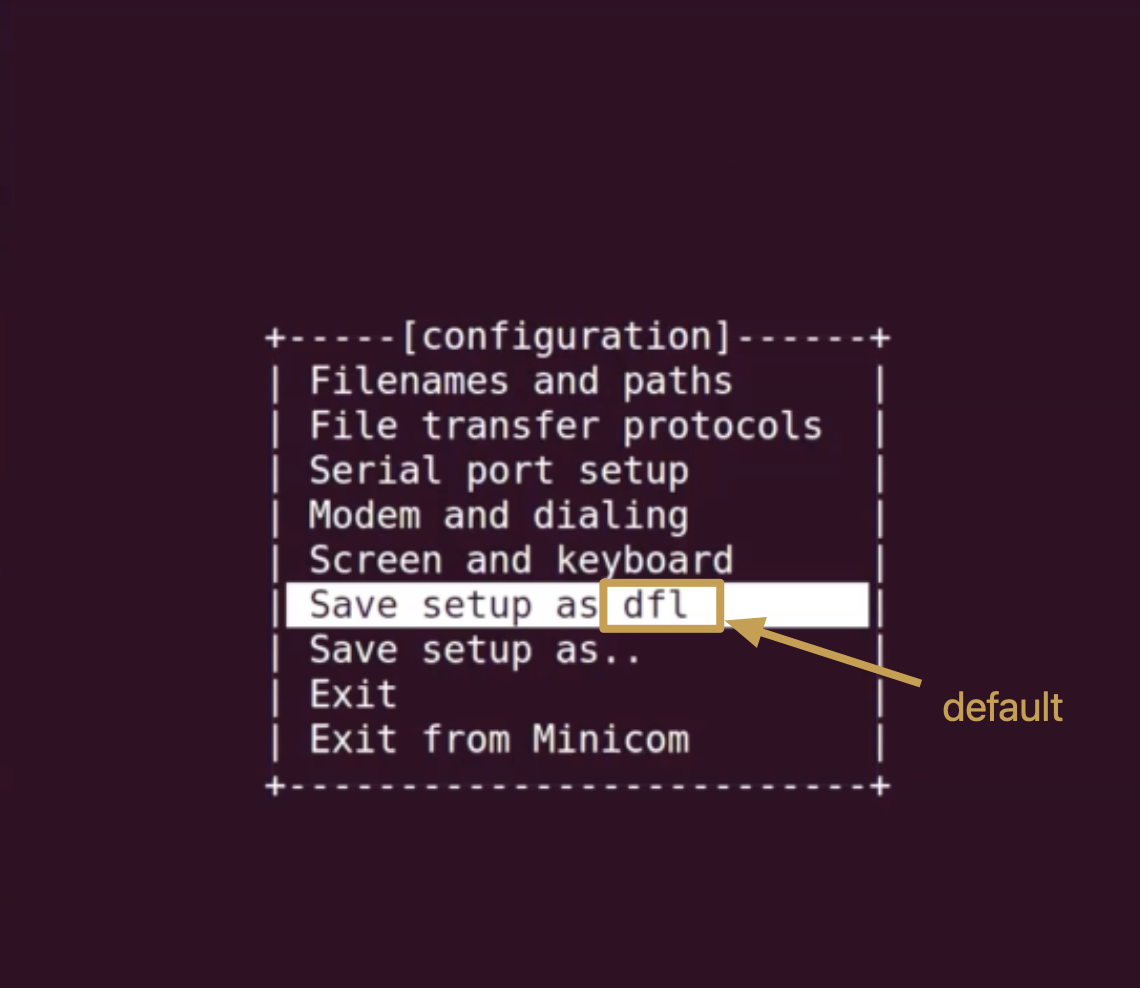
- 참고로 dfl은 디폴트임
- 비글본 블랙 전원 on
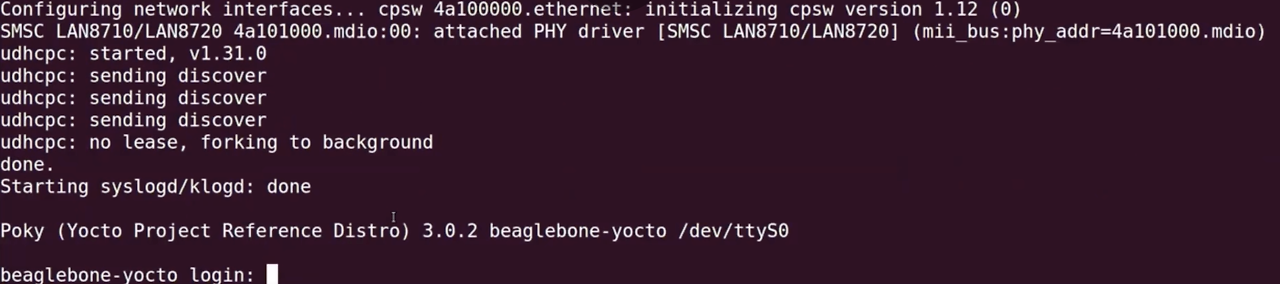
로그인 화면이 뜬다.
beaglebone-yocto logrin: root

로그인 성공
erase eMMC
- 기본적으로 eMMC(embedded MultiMediaCard) boot가 선택되어 있다.
- eMMC 파티션에서 MLO를 renaming 했고, 이미 가지고 있는 이미지로 부팅하기 때문에 eMMC boot disable 해야한다.
- 다음의 u-boot prompt 상의 두 커맨드로 간단하게 eMMC boot Disable할 수 있다.
- u-boot prompt에서 멈추기 위해 powering up 이후 timeout 전에 press Enter!
# mmc dev 1
# mmc erase 0 512- 첫 번째 명령은 eMMC card를 선택한다.
- 두 번째 명령은 beaglebond이 eMMC로 부터 부팅 시도를 하지 않게 하기 위해 지정한 곳을 삭제한다.
- 준비한 SD카드를 꼽고 다시 비글본 power on 하자
meta-raspberrypi
- 라즈베리파이 BSP Image를 만들어보자.
- https://layers.openembedded.org/layerindex/branch/master/layers/에서 라즈베리파이 BSP 레이어 다운로드
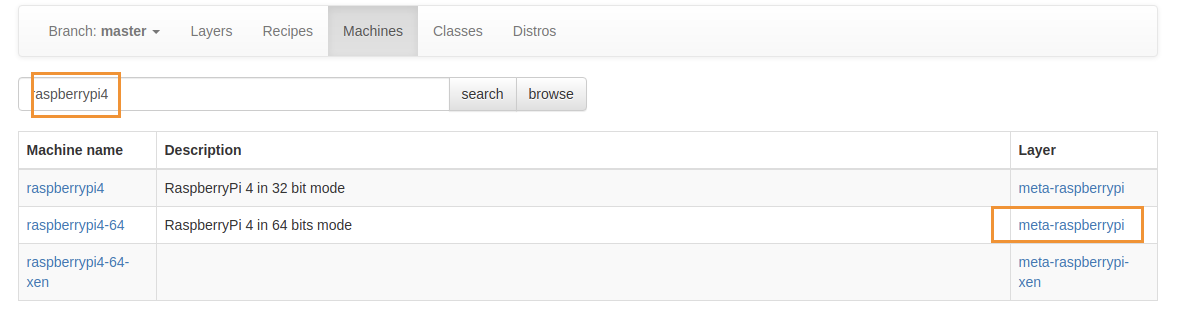
- git clone 한다.
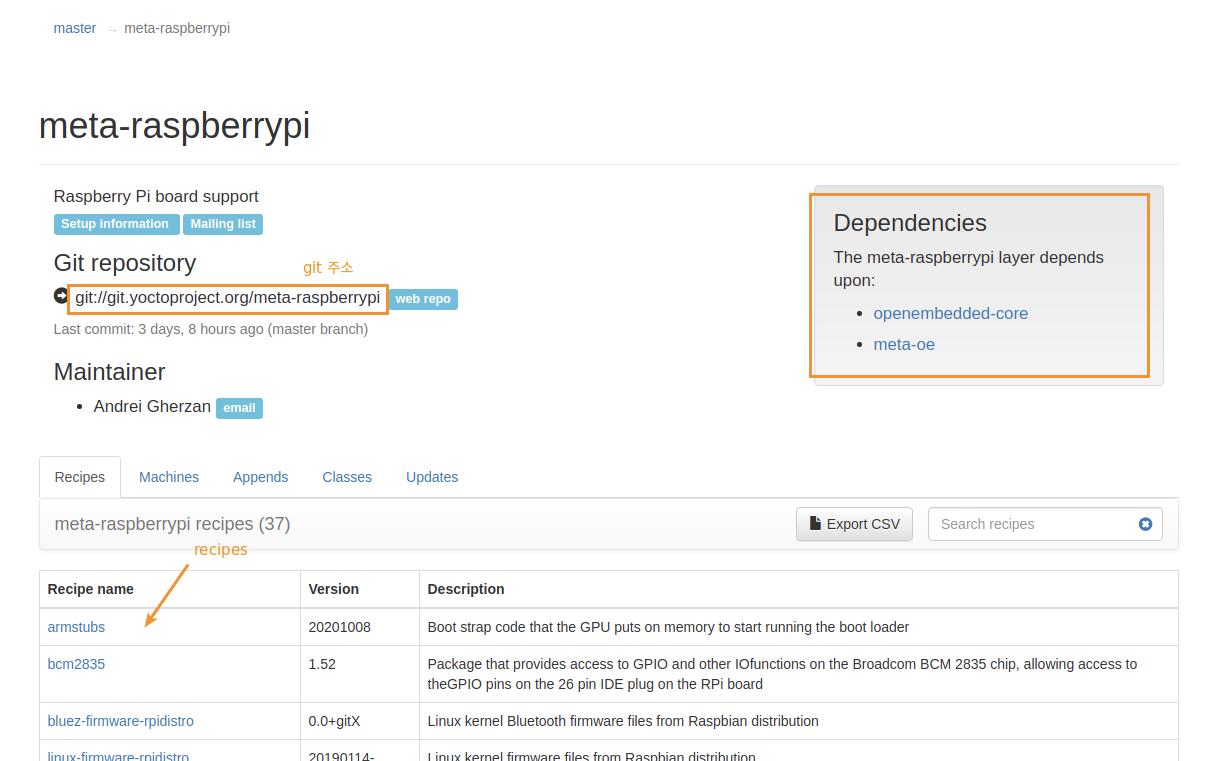
$ git clone git://git.yoctoproject.org/meta-raspberrypi
주의!! poky 브랜치와 같은 코드네임으로 checkout!
- dependency check
README
- dependencies
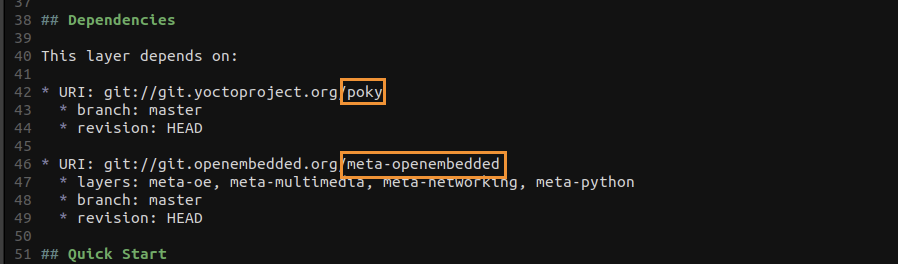
- 이 레이어는 디펜던시가 poky, meta-openembedded 레이어
- poky는 있으니까, meta-openembedded 레이어 다운!
- $ git clone git://git.openembedded.org/meta-openembedded
- branch를 poky code-name과 맞추어 checkout
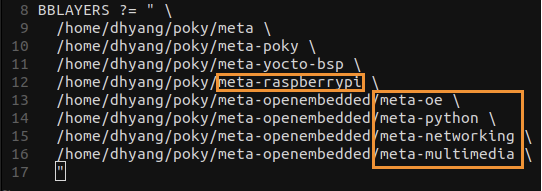
- meta-raspberrypi 레이어는 meta-openembedded 에서 meta-oe, meta-multimedia, meta-networking, meta-python 레이어 사용함을 명심
- poky는 있으니까, meta-openembedded 레이어 다운!

- bblayers.conf에 위 레이어들 등록
- build/conf/bblayers.conf에 meta-raspberrypi 레이어와 하위 디펜던시 레이어를 추가한다.
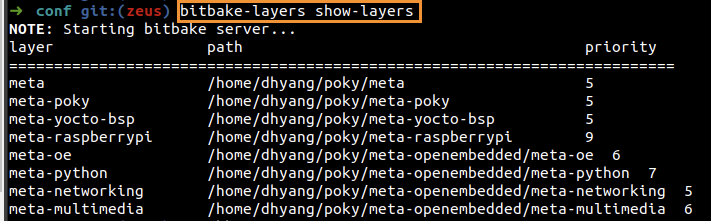
- $ bitbake-layers show-layers
- build/conf/local.conf에 MACHINE 변수에 추가할 MACHINE.conf 레시피 확인
- 라즈베리파이 BSP 레이어 내부 conf/machine 에서 확인

- build/conf/local.conf에 MACHINE = "raspberrypi4-64"으로 변경
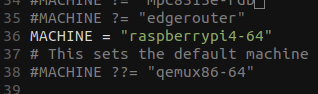
- 추가적으로 저장공간 아끼고 싶으면 INHERIT += "rm_work" 추가
- meta-raspberrypi BSP 레이어에서 지원하는 이미지 체크
- $ ls poky/meta-raspberrypi/recipes-*/images

- rpi-hwup-image.bb: core-image-minimal
- rpi-basic-image.bb: core-image-minimal, with some added featrues
(ssh-server-dropbear a splash screen) - rpi-test-image.bb: rpi-basic-image, with some pkgs present in meta-raspberrypi
- rpi-hwup-image.bb 내용
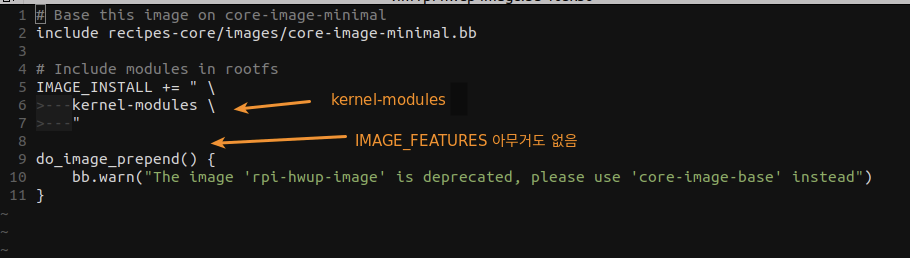
- rpi-basic-image.bb 내용
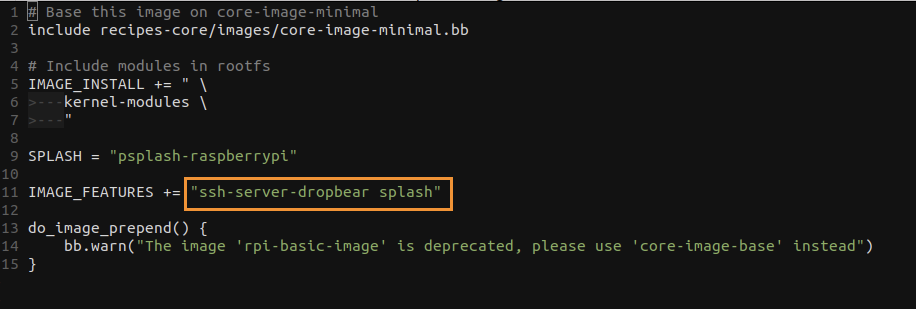
- UART
- 라즈베리파이는 기본적으로 UART disabled set
- build/conf/local.conf에서 ENABLE_UART = "1" 하면 UART 사용 가능
bitbake build
- 원하는 라즈베리파이 image를 bitbake build하면된다.
rpi-basic-image falsh
$ bitbake rpi-basic-image
poky/build/tmp/deploy/images/raspberrypi3/rpi-basic-image-raspberrypi3.wic.bz2 생성확인

주의!! wic 파일이 이미지파일임
1. wic.bz2 -> $ bunzip2 로 bz2 압축풀기 -> wic 파일만 flash 해야함
2. $ bunzip2 -f ./image.wic.bz2
3. $ wic ls ./image.wic로 확인 (wic는 현재 쉘이 source oe-init-env가 적용된 상태에서 사용할 수 있음)

4. flash
$ sudo dd if=[img위치]/rpi-basic-image-raspberrypi3.wic of=/dev/sdb bs=4096 status=progress && sync
$ sudo eject /dev/sdb
Power up RPI
Stage 1 Booting - OnChip ROM
- GPU: On, CPU: Off, SDRAM: Off
- Broadcom SoC에 작은 boot ROM이 있다.
- SD card에 bootcode.bin을 찾도록 프로그램되어 있다. ---- (bootloader)
- bootcode.bin을 찾아 L2 Cache메모리에 로드한다. ----- (bootcode.in)
Stage 2 Booting - bootcode.bin
- GPU: On, CPU: Off, SDRAM: On
- VideoCore GPU에서 실행된다.
- SDRAM이 사용가능해 진다.
- Stage 3에서 사용될 start.elf가 SDRAM에 로드된다. -------- (start.elf)
Stage 3 Booting - start.elf
- GPU: On, CPU: On, SDRAM: On
- start.elf는 VCOS(VideoCore OS)라고 알려져 있는 GPU에 대한 완전한 독점 OS이다.
- VideoCore에 대한 configuration parameter (Video/HDMI modes, memory, console frame buffers etc)와 Linux Kernel (load addresses, device tree, uart/console baud rates etc) kernel= kernel.img를 포함하는 config.txt를 읽음으로써 시작한다. ----- (config.txt)
- cmdline.txt가 존재하면 이를 로드해서 그 내용을 커널 커맨드 라인으로서 전달한다. -- (cmdline.txt)
- ARM CPU를 활성화하고 ARM CPU에서 실행되는 커널 이미지를 로드한다. ---- (kernel.img)
- dtb 파일을 로드한다.
serial
- USB TTL-2303(PL2303) for serial communication
- USB-TTL은 J8 커넥터에 연결된다.
J8 PinUSB TTL Function
| 6 | GND |
| 8 | RXL |
| 10 | TXL |
$ sudo minicom -s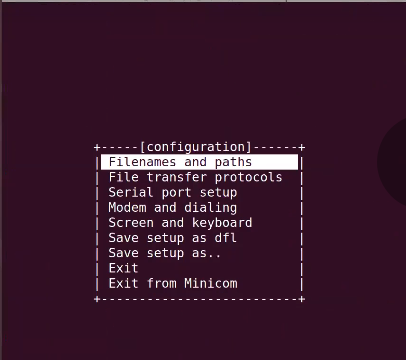
-> Serial port setup
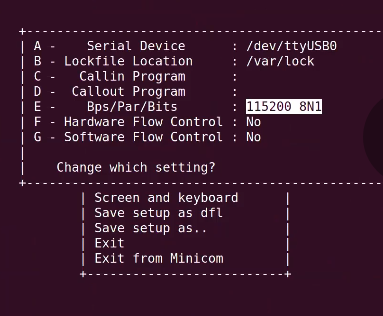
-> 115200 8N1
-> Save setup as dfl
ssh
- 이미지 rpi-basic-image를 설치 했을 때, ssh 사용가능하다.
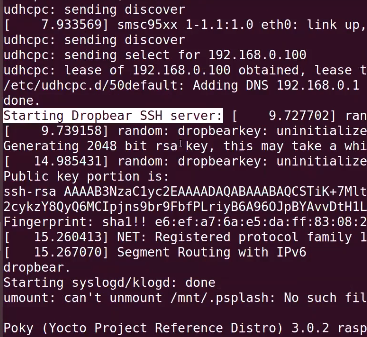
실행되면서, Dropbear SSH server를 실행한다.
위의 예에서 raspberrypi ssh IP는 그위에 표시된대로 192.168.0.100이다.
용량 늘리기

- SD 용량에 비해 너무나도 root filesystem의 Size가 작다.
Lets add extra free space to the root filesystem image!! - 변수는 KB단위
- Default value : 0
- 예: 4 GB의 Free space가 필요하다면, IMAGE_ROOTFS_EXTRA_SPACE = "4194304"
- Check EXTRA SPACE value
build $ bitbake -e rpi-basic-image | grep ^IMAGE_ROOTFS_EXTRA_SPACE=

- build/conf/local.conf에서 IMAGE_ROOTFS_EXTRA_SPACE = "4194304"

- $ bitbake rpi-basic-image
- 다시 이미지 Flash
- $ sudo dd if=rpi-basic-image-raspberrypi4.rpi-sdimg of=/dev/sdb bs=4096 && sync
출처: https://velog.io/@markyang92/posts?tag=Yocto
'Yocto Project : : Open Source' 카테고리의 다른 글
| sstate-cache, signature (0) | 2024.06.01 |
|---|---|
| meta-raspberrypi image (0) | 2024.06.01 |
| (R)PROVIDES, PREFERRED_(PROVIDER|VERSION)_ (0) | 2024.06.01 |
| dependency : $(R)DEPENDS, $RRECOMMANDS, (BAD|NO)_RECOMMENDATIONS, PACKAGE_EXCLUDE (0) | 2024.06.01 |
| PATH (0) | 2024.06.01 |